Elta 7550 Manuel d'utilisateur
Naviguer en ligne ou télécharger Manuel d'utilisateur pour Haut-parleurs pour voitures Elta 7550. Elta 7550 Benutzerhandbuch Manuel d'utilisatio
- Page / 58
- Table des matières
- MARQUE LIVRES
- MODEL 7550 2
- ANMERKUNGEN ZU DEN DISCS 4
- ELEKTRISCHER ANSCHLUSS 8
- ÄNDERUNG DES WINKELS 8
- FERNBEDIENUNG 9
- GRUNDLEGENDE BEDIENUNG 11
- Bildschirm angezeigt 15
- (USB-Kabel) 16
- USB Port 16
- EINSTELLUNGEN 19
- TECHNISCHE DATEN 26
- FEHLERBEHEBUNG 27
- WEITERE INFORMATIONEN 28
- GARANTIE UND KUNDENDIENST 29
- DISC NOTES 32
- INSTALLATION 33
- ELECTRIC CONNECTION 36
- CHANGE ANGLE 36
- REMOTE CONTROL 37
- AU X I N 39
- (USB connect line) 44
- SPECIFICATION 54
- TROUBLE SHOOTING 55
- FURTHER INFORMATION 56
- © GmbH 58
- Carl Zeiss Straße 8 • 58
- 63322 Rödermark 58
Résumé du contenu
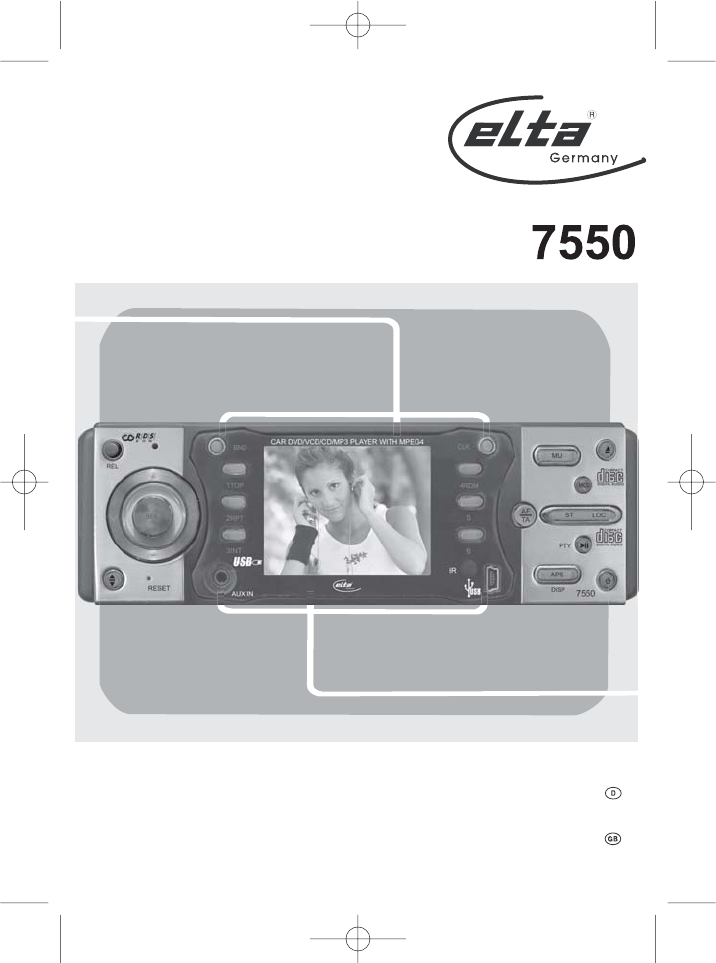
CAR RADIO WITH TFT DISPLAY AND DVD PLAYERAUTORADIO MIT TFT DISPLAY UND DVD-PLAYER
10.14. BAND (OSD) Während der Wiedergabe einer Disc drücken, um Informationen zu dieser Disc zu erhalten (Band-Wechsel im Radio- Modus).1
11.GRUNDLEGENDE BEDIENUNG1. (EIN/AUS) Zum Einschalten des Geräts drücken, zum Ausschalten des Geräts erneut drücken.2-3. VOL+/VOL- &am
12.5. TA/AF Taste TA Funktion (Verkehrsdurchsagen) (nur RDS) Im Radiomodus: Mit kurzem Tastendruck wird TA ein- oder ausgeschaltet. Bei
13.2 Im Modus TRACK DIGEST oder DISC/TRACK INTERVALL können Sie mit den / / / -Tasten einen Punkt anwählen, mit der Enter-Taste
14.16. /PTY Drücken Sie in Wiedergabemodus zur vorübergehenden Unterbrechung (Pause) und erneut zur Fortsetzung der Wiederg
15. MP3/WMA/JPEG-Disc abspielen1 Wenn eine MP3/WMA/JPEG-Disc eingeführt wirdBsp. MP3 Datei wurde erkannt1: Momentaner Titel (Datei)2: Nu
16.Hinweise zur BremsfunktionFalls die Feststellbremse nicht angezogen ist, wird "Parking Brake" auf dem Monitor aufleuchten und eine Wie
17.• OSD Taste zum dritten Mal gedrückt:• OSD Taste zum vierten Mal gedrückt:• OSD Taste zum fünften Mal gedrückt: Anzeige auf dem Bildschirm wi
18.Funktion mehrere Untertitelsprachen (nur bei DVD)Während der Wiedergabe die SUBTITLE Taste drücken, um die Sprachen der Untertitel der Reihe nac
19.EINSTELLUNGENAllgemeine Einstellungen1. SETUP Taste auf der Fernbedienung drücken.2. SETUP Menü wird angezeigt.3. Mit / / / Ta
SICHERHEITSVORKEHRUNGENDas folgende Etikett wurde am Gerät angebracht, um den richtigen Umgang mit dem Laserstrahl aufzuführenLASER PRODUKT DER KLAS
20.1. Einstellung TV-Anzeige:Auswahl des erforderlichen Bildformats (4:3 oder 16:9), je nach angeschlossenem TV Gerät.• Normal/PS (4:3 Fernsehe
21.4. SPDIF-Ausgang:Über diesen Punkt kann der Audioausgang von SPDIF OFF auf SPDIF/RAW oder SPDIF/PCM umgestellt werden.5. Einstellung CAPTIONS:
22.7. Einstellung LAST-MEMORY:Funktion über diesen Menüpunkt aus- oder einschalten.LautsprechereinstellungHier aktivieren Sie den Audioausgang vom
23.Steuerung des Dynamischen Wertebereichs (DRC):DRC auswählen und den dynamischen Wertebereich eines mit Dolby Digital kodierten Programms anpasse
24.3. Einstellung Untertitelsprache:Bevorzugte Untertitelsprache mit den Pfeiltasten anwählen.4 Einstellung Menüsprache der Disc:Bevorzugte Sprac
25.6. Passwort:CHANGE auswählen und Enter drücken. Das alte Passwort eingeben (ab Werk eingestellter Code ist 1379). Neues aus 4Zeichen bestehende
26.TECHNISCHE DATENSpannungsversorgung: 12V (11V - 15V)Leistungsaufnahme: Weniger als 10AVideoeingangssignal:
27.FEHLERBEHEBUNGÜberprüfen Sie zuerst alle Anschlüsse, bevor Sie die folgende Liste durchgehen. Sollten Fehler und Störungen danachweiterhin beste
28.WEITERE INFORMATIONENAchtung bei Kleinteilen und Batterien, bitte nicht Verschlucken, dies kann zu ernsthaften Schädigungen oderErticken führen.
29.GARANTIE UND KUNDENDIENSTVor Auslieferung werden unsere Geräte einer strengen Qualitätskontrolle unterworfen. Sollte trotz aller Sorgfalt bei de
3. - Das Netzkabel oder der Stecker beschädigt sind. - Objekte oder Flüssigkeiten in das Gehäuse des Gerätes gelangt sind. - D
SAFETY INSTRUCTIONSThe following label has been affixed to the unit, listing the proper procedure for working with the laser beam:CLASS 1 LASER PROD
• SERVICING - The user should not attempt to service the appliance beyond that described in the user operating instructions. All other servicing
DISC NOTESDisc formats supported by this playerDVD 12 cm (single-sided disc only)Video-CD 12 cmCD 12 cmMP3 12cmHandling and cleaningDirt, dust, scratc
Preparing new discs with rough spotsA new disc may have rough edges on its inside and outside edges. If a disc with rough edges is used, the proper se
If you want to take CHASSIS out of the SLIDE BRACKET HOUSING, first remove the PLASTIC COVER of the both sides away, then insert the two KEY PLATES in
How To Remove And Install The Front PanelWhen detaching or attaching the control panel, be careful not to damage the connectors on the back of the con
CHANGING THE CONTROL PANEL ANGLEIf you want to change the angle to play, you can press the Angle button repeatedly to select the desired angle as foll
REMOTE CONTROL1. CLK Press it to change the display to clock display.2. MODE Press it to change between RADIO, DISC and AUX IN mode.3.
15. POWER Press to turn the unit ON or OFF.16. PLAY/PAUSE Press in play mode to pause; press again to continue playback.17. MUTE Press
BASIC OPERATION1. (POWER On/Off) BUTTON Press it to turn on the unit. Press it again to turn off.2-3. VOL-+/VOL- & SEL BUTTON
4.ANMERKUNGEN ZU DEN DISCSFormate, die von diesem Abspielgerät unterstützt werdenDVD 12 cm (nur einseitig)Video-CD 12cmCD 12 cmMP3 12cmHandhabung u
5. TA/AF BUTTON TA Function [traffic Announcement] Button(for Rds Only) In RADIO mode When pressed briefly, it is activated in TA mode ON or
2 In Track Digest OR Disc/Track Interval MODE: You can use the / / / buttons to select the items. Then press ENTER to confirm. You
42.17. / BUTTONS• When face right or left swing the SEL knob / button (more than 2 seconds) during play. The speed of rapid f
43. In Stop mode, use / / / on the remote control to select the item or folder, then press ENTER button to confirm. Pressing R
44.3 In USB mode (when the disc is in the unit) Press the SETUP button once, and then press the GOTO button, the unit will change the DISC mode
• Press OSD for the second time:• Press OSD for the third time: • Press OSD for the fourth time:• Press OSD for the fifth time: The message on th
MPEG4 disc playMPEG4 disc is playing as the format of FILE. For example:In stop mode, use / / / on the remote control to select the item
SETUPGENERAL SETUP1. Press SETUP button on the remote control.2. The SETUP menu is displayed.3. Select the preferred item by using the / /
1. TV display setupThis is to select the appropriate TV aspect (4:3 or 16:9) according to the connected TV set.• Normal/PS (For 4:3 TV) Played
4. SPDIF outputThis is to activate the audio output from SPDIF OFF mode to SPDIF/RAW mode to SPDIF/PCM mode.5. CAPTIONS setupActivate the CAPTIONS
5.Eine neue Disc könnte an ihrer Innen- bzw. Aussenkante raue Stellen aufweisen.Wenn Sie eine Scheibe mit einer rauen Kante abspielen, können Einst
7. LAST MEMORY setupSelect the LAST MEMORY output ON/OFF.SPEAKER SETUPThis is to activate the audio output from DOLBY AC3 5.1 DOWNMIX to 2 channel mo
DYNAMIC RANGE CONTROLSelect DRC and adjust the dynamic range of Dolby Digital encoded program. There are 8 steps between full compression and off comp
3. SUBTITLE LANGUAGE SETUPSelect the preferred SUBTITLE language by using the cursor buttons.4. DISC MENU LANGUAGE SET UPSelect the preferred DISC M
6. PASSWORDSelect the change and press ENTER button. Type the old password (The initial factory code is 1379) and key in 4 characters password now yo
SPECIFICATION Supply Voltage: 12V DC (11V-15V)Current Consumption: Less than 10ASignal System: Composite
TROUBLE SHOOTINGBefore going through the checklist, check wiring connection. If any of the problems persist after check list has been made, consult yo
FURTHER INFORMATIONElectrical devices are not for childrenNever allow children to use electrical devices unsupervised. Batteries/rechargeable batterie
GUARANTEE AND CUSTOMER SERVICEBefore distribution, our appliances undergo a strict quality control. However despite all the care, should the product s
© GmbHCarl Zeiss Straße 8 •63322 Rödermark
6.Falls Sie das Gerätegehäuse aus der Einbauhalterung herausnehmen möchten, entfernen Sie zuerst auf beiden Seiten diePlastikabdeckung und bringen
7.Installieren und Abnehmen der FrontplatteLassen Sei beim Ansetzen und Abnehmen der Frontplatte bitte besondere Vorsicht walten, um die Anschlüsse
8.Änderung des Winkels der FrontblendeWenn Sie den Winkel der Blende ändern möchten, drücken Sie die Taste (19) mehrmals, um aus den folgendenMö
9.FERNBEDIENUNG1. CLK Drücken, um zur Zeitanzeige umzuschalten.2. MODE Drücken, um zwischen RADIO, DISC und AUX IN Modus umzuschalten.3. STOP
Produits connexes et manuels pour Haut-parleurs pour voitures Elta 7550


 (71 pages)
© 2020, manymanuals.fr. Tous droits réservés | 1.889 s |
 Manymanuals.com
 Manymanuals.de
 Manymanuals.fr
 Manymanuals.it
 Manymanuals.pl
 Manymanuals.cz
 Manymanuals.es
 Manymanuals-pt.com
Commentaires sur ces manuels